This was written for a client who has a 1977 through 1980 MGB that wanted to have a few easy steps to prepare before his engine test fit. Similar steps are also taken in the 1962-1976 model year MGBs. The wiring in this car is not being completely replaced. If the wiring was to be totally replaced, we would just say- pull the wiring out and save it for the various wiring loom plugs to reuse. So- Onwards!
Prep the Engine Bay
Next steps for All MGB engine conversion types.
______________________________________________________________________________________
Hi,
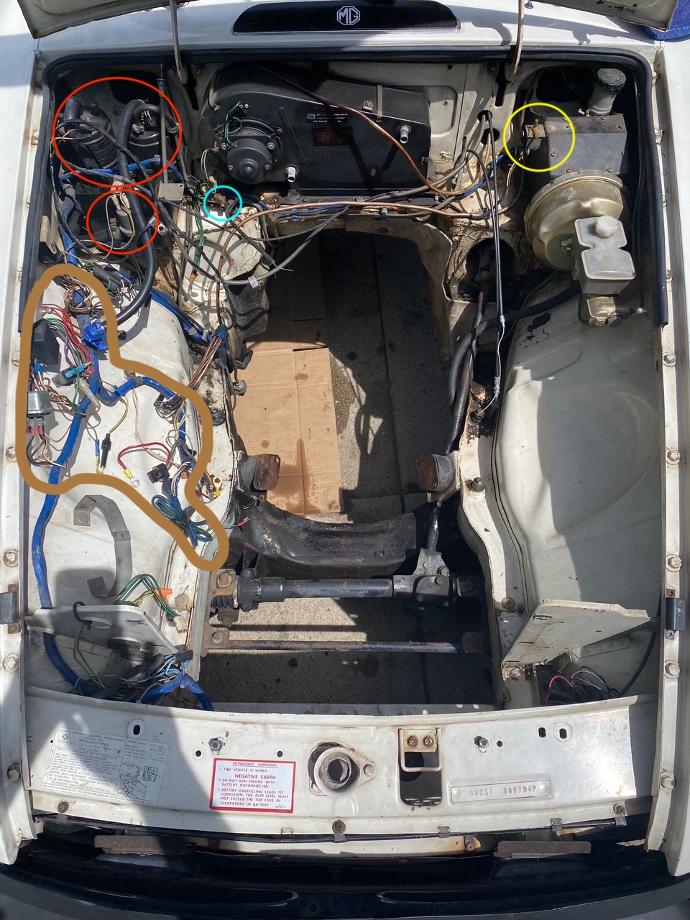
Going off your photo, here are a number of items that can take place now, before you even get to the engine test state, and these will also help to clean things up and allow you to be ahead of the game later.
In your photo, items we would take on next:
Remove the rubber engine mounts.
Slightly loosen, but do not remove the four subframe nuts on the engine bay side framerails.
Disconnect the slave cylinder line down at the bottom of the engine bay. The line itself will not be reused in most cases, but ALL of the Hardware that is fit on the master cylinder will be reused. We have plenty of people that misplace that hardware (Banjo Bolt, Copper Washers and Banjo Fitting) and have to wait a week to get it from a vendor and spend about $45 in parts and freight. Don’t lose any of the hardware on the clutch master cylinder side!
Remove the centre console (arm rest portion) and the steel plate that fits to the body above the shifter. This is so the various shifter types can be fit into the body, which the large opening helps immensely.
Remove the speedometer cable.
The Speedometer and tachometer are removed by turning them 90 degrees in the 1977-1980 MGB dashboard. Earlier gauges have two finger nuts holding them in place. The 77-80 are removed kind-of-like popping off a mayonnaise jar lid. Having the gauges loose in the dashboard will save time later when going through that part of the process, and for now, keeping parts there makes for less shelf space taken.
In the photo, the Light blue circled item is the oil pressure line end. We remove this line from behind the dashboard and re-run it out the drivers side of the dashboard. (This comes in the instructions for that part, like most of our products) Disconnect the connector bolted to the firewall from the oil pressure gauge, remove the line from behind the dashboard and save all the clips and bits to it. Clean it up and put all the parts in a plastic bag on your parts shelf that you've specifically set up for your project. This will be re-formed and reinstalled as our instructions included in the part read. Removal is a much harder process than reinstallation.
That same light blue circle shows the location of the flex line, which is not in the photo. That line will be required for the original type mechanical gauge.
The large red circle is the charcoal cannisters. They are not used with the replacement engine in 99% of conversions.
The small red circle is the “gulp valve” if memory serves. That is no longer used and can be deleted. Label the wires “Emissions” so it can be dealt with (removed) at a later time.
As this unit is fit to the black case that normally holds the wiper washer bottle in the late model 77-80 MGB, you can choose to keep that to reinstall your washer bottle and washer pump motor or remove it- determine if you will have a washer in the car and keep or remove it as you see fit.
The yellow circle on the right is an emissions device that is used for the original distributor and is useless for our needs. Remove it and then: reinstall all hardware back in the holes, and label the wires “Emissions” so You or I can deal with those at a later time.
The wiring loom, circled in the brown line between the relays, fuse panel and all wires running to the original engine- should have the blue tape covering removed, but leave the wires in place- don’t turn them in to a gaint tangled spider web. They can be cleaned with carburetor cleaner so there is no sticky mess. These are where most of the wiring will be cut and spliced in for both carbureter and fuel injection when placed in just about every MGB. Now if a person is going to re-run their wiring, much of these wires will be pulled back into the cockpit, spliced and soldered somewhere behind the dashboard glovebox area.
While at it, wipe the engine bay and gearbox tunnel down and degrease them. The cleaner it is, the less time the mechanic will spend cleaning it, his hands, or other items that he is working on from grease surface transfers for the next month of Sundays that this project is worked on. Cleanliness is next to Godliness, and this will be proven to anyone leaving it a mess as Cleaning it out in the beginning can save an unknown amount of time. This is often something people say “good enough” to and it costs a couple of minutes here and there adding up in costs that no one admits to, but time spent is time that could have went towards other parts of a project.
Cheers,
-Brian.
Test Fit: MGB V6 Stripping the Engine Bay